Kinder Pre Trip Lesson Plan
Restoring Connections
Kindergarten Pre-Trip Lesson Plan
Spring 2022
Adapted By*: Armon Ashoubi, Emily O’Brien, Kaylie Smith, Michelle McKee, Riley Roefaro
*Adapted from past Restoring Connections Teams
Time: 30 minutes
Overview: By focusing on awareness and observation skills, kindergarteners have the opportunity to learn about the natural world through all their senses. This in-class lesson introduces kindergarteners to the joy of exploring the natural world through story time and a coloring activity designed to prepare them for their field trip. The focus of these events is to inspire keen observation using all their senses.
Rationale: This classroom lesson is designed for teachers who seek to introduce students to basic species survival needs. This will be beneficial to the students because it teaches critical thinkinking and develops empathy toward non-human species.
Learning Outcomes:
By the end of this 30 minute lesson, students will be able to:
Links to Standards:
Materials Needed:
Materials Set-up:
Background Information:
The calypso bulbosa, commonly known as the fairy slipper orchid, is a flowering plant commonly found in the Northwestern United States. It usually grows in wet, coniferous forests. A solitary flower blooms in spring and is often pink in color.
(fairy slipper orchid reference photos)
Activity Description:
Step 1. Getting Started: Introductions (5 minutes)
(NOTE: If there is silence after a question, encourage the students to participate by waiting and being okay with the silence. This extra time creates space for students to think of the answers to questions and feel more comfortable sharing. If they seem reluctant, it is okay to begin giving them answers - the point is that they are thinking about what you are saying and in the process learning.)
Step 2. Story Time (10 minutes)
(NOTE: This story will hopefully inspire excitement about building fairy houses, and will also teach the students the “rules of the woods” which enforces stewardship and care.)
After the story, complement the students for listening carefully and ask for three volunteers to share:
(NOTE: If there are 2 facilitators or an aide, one can read the story while the other sets out materials. If there is only one instructor, wait to hand out materials until after the story.)
Step 3. Coloring Activity (10 minutes)
Step 4: Assessing Understanding (2 minutes)
Step 5: Wrap Up (3 minutes)
Coloring Sheet Key:
Petals (purple)
Stem (brown)
Roots (brown)
Soil (brown)
Leaves (green)
Kindergarten Pre-Trip Lesson Plan
Spring 2022
Adapted By*: Armon Ashoubi, Emily O’Brien, Kaylie Smith, Michelle McKee, Riley Roefaro
*Adapted from past Restoring Connections Teams
Time: 30 minutes
Overview: By focusing on awareness and observation skills, kindergarteners have the opportunity to learn about the natural world through all their senses. This in-class lesson introduces kindergarteners to the joy of exploring the natural world through story time and a coloring activity designed to prepare them for their field trip. The focus of these events is to inspire keen observation using all their senses.
Rationale: This classroom lesson is designed for teachers who seek to introduce students to basic species survival needs. This will be beneficial to the students because it teaches critical thinkinking and develops empathy toward non-human species.
Learning Outcomes:
By the end of this 30 minute lesson, students will be able to:
- Identify 3 key characteristics of the Fairy Slipper (Calypso bulbosa) orchid.
- Compare and contrast the seasons - specifically noting changes in weather patterns and plant and animal life.
- Name four things plants and animals need to survive (food, shelter, water, and space).
Links to Standards:
- K-LS1-1. Use observations to describe patterns of what plants and animals (including humans) need to survive.
- K-ESS2-1. Use and share observations of local weather conditions to describe patterns over time.
Materials Needed:
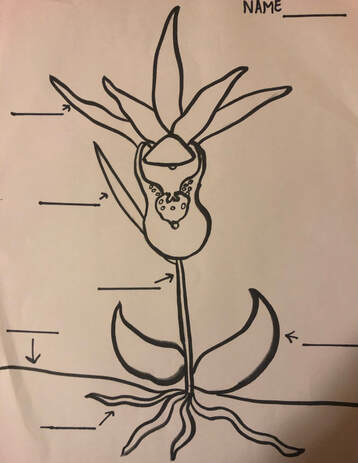
- Fairy slipper orchid coloring sheet (attached)
- Colored pencils
- Laminated species poster of the Calypso bulbosa/Fairy slipper orchid (attached)
- Kane, T.L. (2001). Fairy houses. Lee, NH: Great White Dog Picture
- Proper clothing examples. Either wear or bring rain boots, long pants, a long sleeved shirt, a sweater, rain jacket, hat, and gloves (as dictated by weather)
Materials Set-up:
- Print fairy slipper orchids coloring sheets: one per student and two or three backups.
Background Information:
The calypso bulbosa, commonly known as the fairy slipper orchid, is a flowering plant commonly found in the Northwestern United States. It usually grows in wet, coniferous forests. A solitary flower blooms in spring and is often pink in color.
(fairy slipper orchid reference photos)
Activity Description:
Step 1. Getting Started: Introductions (5 minutes)
- Have students move from their desks into a circle. (ELP students should be integrated between kindergarten students, not sitting next to each other).
- Introduce yourself with your name and an animal that starts with the first letter of your first name, and share your favorite activity to do outside. Have other facilitators introduce themselves the same way.
- Q: “Now that we have introduced ourselves to you all, can I see a quiet hand if you love to play outside?”
- A: Awesome, almost everyone. I know I love to run around and breathe the fresh air when I am outside.
- Q: “What season is it when we can build snowmen outside and have to bundle up in warm clothes?”
- Q: “Who can tell me what season we are in now?” (Spring!)
- Q: “How can we tell that it is springtime?” Consider sharing a story about what you saw outside today while walking to the classroom. Ask the students what we see in springtime that we do not see in other seasons.
- A: The flowers are blooming, the days are getting warmer, the sun is coming out more, new births!
- Discussion: “One time, when I was using my senses in nature, I was lucky enough to see a coyote. We were very quiet, and gathered down the trail from the coyote. Slowly, it scampered away in the trees so quietly!”
- When we are on our field trip, we will have the chance to practice walking quietly like a coyote on the trails!
- Now, my friend (facilitator name) will be talking to us all about fairy houses!
(NOTE: If there is silence after a question, encourage the students to participate by waiting and being okay with the silence. This extra time creates space for students to think of the answers to questions and feel more comfortable sharing. If they seem reluctant, it is okay to begin giving them answers - the point is that they are thinking about what you are saying and in the process learning.)
Step 2. Story Time (10 minutes)
- Ask: “Can I see a quiet hand, who here has ever built a fairy house?”
- Acknowledge them and create some excitement about it!
- Tell the students you brought in your favorite book about a girl, named Kristen, who discovers the magic hidden within the forests. She teaches us how to build a fairy house and what species need in their homes to survive.
- Tell the students you need their help to: “listen carefully and make silent observations of the illustrations because at the end of the story we are going to brainstorm ideas of what we can use for a fairy house. In just two days we will get the chance to build our very own fairy houses at the meadow.”
- Reinforce: “As I read, pay attention to what Kristen supplies the fairies to help them survive.”
- Read: Kane, T.L. (2001). Fairy houses. Lee, NH: Great White Dog Picture.
- Due to time constraints, do not read the pages about the seasons.
(NOTE: This story will hopefully inspire excitement about building fairy houses, and will also teach the students the “rules of the woods” which enforces stewardship and care.)
After the story, complement the students for listening carefully and ask for three volunteers to share:
- Q: “What are some things that we could use to make a fairy house?”
- A: Sticks, leaves, etc.
- Q: “What are things that fairies need to survive?” “What can they eat or drink?”
- A: Every living species, even fairies, need: food, water, shelter and space to live.
(NOTE: If there are 2 facilitators or an aide, one can read the story while the other sets out materials. If there is only one instructor, wait to hand out materials until after the story.)
Step 3. Coloring Activity (10 minutes)
- After reading the story, connect it to the fairy slipper orchid that is found in nature. Have the students direct their attention toward the front of the classroom (or the projector).
- Say something along the lines of “Now, I am going to tell you about this amazing flower that grows in nature. It is so tiny that it is called a fairy slipper because a fairy could wear it on their foot!”
- Ask students to describe the flower in detail (have a color sheet that is pre-colored, projected on the board). They have pinkish/purple petals, brown stems, and green leaves. They grow in the spring, alone or in small clusters. They are very rare.
- Q: “What part of the flower is this?”
- Point to the different aspects of the flower and label the coloring sheet as you go with a bold, dark marker. Encourage the students to help you spell if time permits.
- Q: “What color are the leaves? The stem?”
- Ask students to return to their desks to color in their coloring sheets.
- Ask them to color it “realistically” and attempt to label the parts on the coloring (stems, leaves, petals) because that's what “scientists” do.
Step 4: Assessing Understanding (2 minutes)
- Ask the students to return to the circle with their completed flower coloring sheet.
- Ask students to hold up their pictures in an impromptu classroom art show! Make a few positive comments about the detail or the effort involved. Go over the proper labels - stem, leaf, petal, roots.
- Q: “How can we identify fairy slipper orchids when we are out hiking?” (Shape, and colors).
- A: Purple flowers, brownish stems, green leaves, shoe shaped flower petals, and one leaf growing at the base of the stem.
- Q: “Do you think it looks similar to your drawing?”
- Q: “Who thinks they would recognize one in nature?"
- Get them excited to go on a hunt for flowers! (Anyone like treasure hunts? Well this week we are hunting for a variety of flowers in the meadow.)
- Q: “Can someone tell me something about Spring that helps these flowers grow?”
- A: Water, sunlight, etc.
Step 5: Wrap Up (3 minutes)
- “Before leaving, I need your help. Can I please see a quiet hand from someone who can tell me how we should all prepare for our big adventure? Does anyone have any ideas of what we should wear or bring?”
- When they name something, show your gear for a visual, or point to someone who is currently wearing/using the object (ex: layers, long pants, closed-toed shoes/rain boots).
- It may be warmer during the spring, but remind them that they are Oregonians! The rain could always surprise you, and the mornings could be cold. Explain the importance of being prepared just in case the weather changes.
- Remind students that snacks and water will be provided.
- Thank them for such a fun time, and tell them how excited you are for the field trip.
- Ask them to put their drawings in their boxes.
Coloring Sheet Key:
Petals (purple)
Stem (brown)
Roots (brown)
Soil (brown)
Leaves (green)
Kinder Lesson Plan
Restoring Connections
Kindergarten Field Trip Lesson Plan
Spring 2022
Facilitators: Armon Ashoubi, Emily O’Brien, Kaylie Smith, Michelle McKee, Riley Roefaro
Time: 2 hours 20 minutes (8:45AM - 11:05AM)
Subject: Science and English Language Arts
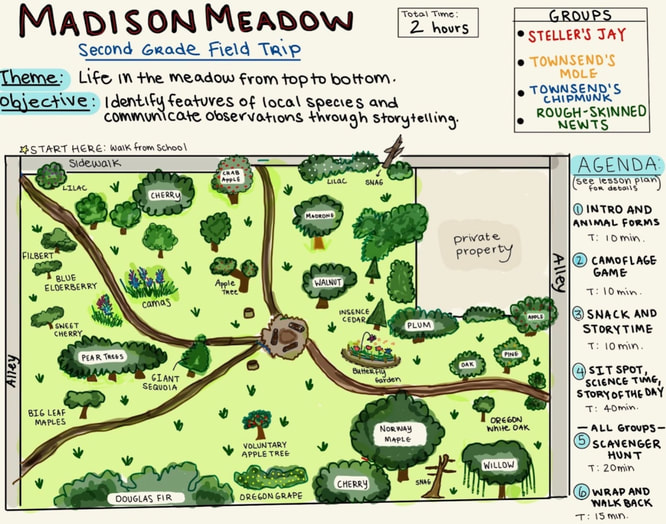
Overview: During this field trip, kindergarten students will complete activities that foster an understanding of what animals and humans need to survive. Students will use their senses to explore nature through journaling, walking and reflecting on the species that live in the surrounding habitat.
Rationale: Students will develop awareness of the natural world around them while educating them on natural history and the environment.
Learning Outcomes:
By the end of the field trip, students will be able to:
Links to Standards:
Materials Needed:
Materials Set-up:
Activity Description:
Step 1. Getting Started: Welcome! And Walk to Park 8:45 AM - 9:20 AM (35 minutes)
Step 2. Fairy Houses 9:20 AM - 9:40 (20 minutes)
Step 3. Camouflage Game 9:40 AM - 10:00 AM (20 minutes)
Step 4. Snack & Storytime 10:00 AM - 10:10 AM (10 minutes)
Step 5. Sit Spots 10:10 AM - 10:20 AM (10 minutes)
Step 6. Field Journals 10:20 AM - 10:30 AM (10 minutes)
Step 7. Story of the Day 10:30 AM - 10:45 AM (10 minutes)
Step 8. Owl Eye Tag 10:40 AM - 10:50 AM (10 minutes)
Step 9. Wrap - Cultivating Gratitude & Giving Thanks 10:50 AM - 10:55 AM (5 minutes)
Kindergarten Field Trip Lesson Plan
Spring 2022
Facilitators: Armon Ashoubi, Emily O’Brien, Kaylie Smith, Michelle McKee, Riley Roefaro
Time: 2 hours 20 minutes (8:45AM - 11:05AM)
Subject: Science and English Language Arts
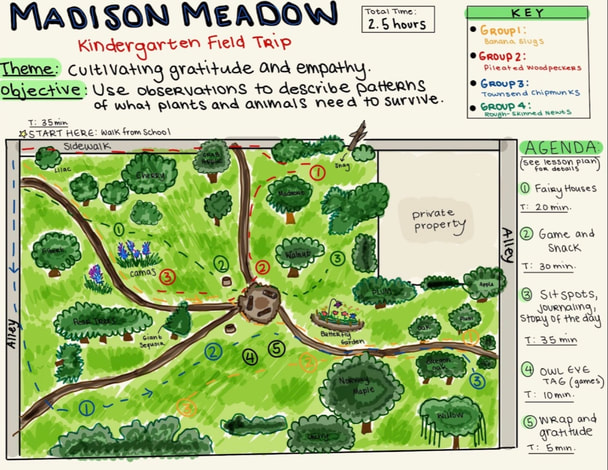
Overview: During this field trip, kindergarten students will complete activities that foster an understanding of what animals and humans need to survive. Students will use their senses to explore nature through journaling, walking and reflecting on the species that live in the surrounding habitat.
Rationale: Students will develop awareness of the natural world around them while educating them on natural history and the environment.
Learning Outcomes:
By the end of the field trip, students will be able to:
- Identify key focal species of the natural area (Big Leaf Maple, Giant Sequoia).
- Use observations to describe patterns of what plants and animals (including humans) need to survive.
Links to Standards:
- K-LS1-1. Use observations to describe patterns of what plants and animals (including humans) need to survive.
- K-ESS2-1. Use and share observations of local weather conditions to describe patterns over time.
Materials Needed:
- Pencils/Crayons
- Sit Spot Tarps
- Name Tags
- Snacks and Waterbottles
- Fairy House Supplies
- Field Journals
Materials Set-up:
- Wear our own name tags, and have students’ name tags ready for them upon arrival.
- Spread fairy house materials on the ground in the spot where building will take place.
Activity Description:
Step 1. Getting Started: Welcome! And Walk to Park 8:45 AM - 9:20 AM (35 minutes)
- Arrive at the appropriate classroom at 8:45 AM. Assist the teacher in reminding students to use the restroom and grab a jacket before leaving the school if needed.
- Establish expectations and group agreements by asking students to share their classroom rules or ideas on how we can stay safe on our field trip. (Staying out of the street and not wandering away from the group). Establish a bathroom break plan. (point out who the floater is).
- This step could be done on the walk to the meadow or in the classroom, depending on weather and the group itself.
- This step could be done on the walk to the meadow or in the classroom, depending on weather and the group itself.
- Divide students into groups with a facilitator at the door before leaving the school. Assign them a group name that highlights a motivating species and a direction (Pileated Woodpeckers/North, Banana Slugs/East, Rough-Skinned Newts/West, Townsend's Chipmunks/South).
- In each small group, have one facilitator at the front of the line, and one at the back.
- While walking, hand out paint swatches and have the students match the color to plants or flowers they see along the way.
- Once we get to Madison Meadow, groups split off into their specific quadrant.
- East leaves first, followed by north, south, and then west.
- East leaves first, followed by north, south, and then west.
- Once in your established quadrant, start secondary introductions.
- Can everyone go around and share their name and favorite animal? Who has been to Madison Meadow before? What are you excited to see?
- Can everyone go around and share their name and favorite animal? Who has been to Madison Meadow before? What are you excited to see?
- Explain deer ears, owl eyes and fox feet before diving into the rest of the days activities
- What do we notice about a deer? Ears that help them hear their predators. (explain what a predator is)
- What do we notice about owls? They have big eyes that help them see even at night time and use peripheral vision (explain peripheral vision)
- What do we notice about a fox? They are sneaky and use quiet feet to sneak up on their prey (explain what prey is)
- What do we notice about a deer? Ears that help them hear their predators. (explain what a predator is)
Step 2. Fairy Houses 9:20 AM - 9:40 (20 minutes)
- Ask students if they remember how to build a fairy house. Recall back to the book read in class.
- Have students use materials on the ground to build a fairy house, in small groups or individually. Remind them not to pull leaves or sticks from plants or trees.
- Emphasize incorporating the 4 things that living things need to survive (water, food, shelter, and space). Ask them what they use each material for.
- Remind students to not destroy their peers’ fairy houses.
Step 3. Camouflage Game 9:40 AM - 10:00 AM (20 minutes)
- Merge two groups together and explain the rules of 10 second camouflage. Have one facilitator act as the counter, and the rest set the boundaries. When explaining, ask for a silent hand who can explain what camouflaging is. Teach the students that camouflaging is when you blend in with the environment around you (provide examples).
- Game: Hide & Seek, but students must be able to see your eyes from their hiding spot.
- Count to 10, then call out students based on their movement or color (what you see)
- Have facilitators/teacher act as boundaries for where the students can go.
Step 4. Snack & Storytime 10:00 AM - 10:10 AM (10 minutes)
- Switch quadrants with group across from you (North switches with West and South switches with East)
- Pass out snacks and give students time to eat their snacks (socially distanced).
- Tell a story about the magic of springtime, incorporating natural history facts about incense cedar forests and focal species.
- Alternatively, you may read a picture book to your group of students.
- Alternatively, you may read a picture book to your group of students.
- Imbed “how to be” in the outdoors and how to do a sit spot. We are getting them excited to do a sit spot of their own
Step 5. Sit Spots 10:10 AM - 10:20 AM (10 minutes)
- Place tarps 10-15 feet apart (or more if available space) on a path or in a nature area, and place students one by one in their specific special area, prompting them to observe the nature around them.
- Try to sit students far enough apart where they cannot directly see each other.
- Try to sit students far enough apart where they cannot directly see each other.
- Sit silently for 5 minutes and encourage them to use their observations.
- Encourage students to use all of their senses. What can they see, hear, smell, and feel?
- Pass journals out to students.
Step 6. Field Journals 10:20 AM - 10:30 AM (10 minutes)
- Have students draw what they observed during their sit spots (using colors) and label what they can. (T for tree, or F for flower).
Step 7. Story of the Day 10:30 AM - 10:45 AM (10 minutes)
- Have students come back together in a circle, ask each student to share one thing they saw, heard, smelled, and experienced.
- They can show pictures from their field journal and talk about what they drew
- They can show pictures from their field journal and talk about what they drew
- Use the art of questioning to dive deeper into their observations. Be sure questions push them to use all their senses.
- Collect field notebooks, later on give to the teachers to return to their students
Step 8. Owl Eye Tag 10:40 AM - 10:50 AM (10 minutes)
- Have one facilitator host Owl Eye Tag.
- Start by explaining the rules of the game.
- Have every participant put their right hand behind their back. Then, players must run around and try to tag other players on said hand. (go over touching lightly, not knocking each other over…)
- When someone is tagged, they must kneel on one knee and raise their other hand until someone tags them back into the game.
- Have other facilitators act as boundaries for the game area.
- Start by explaining the rules of the game.
Step 9. Wrap - Cultivating Gratitude & Giving Thanks 10:50 AM - 10:55 AM (5 minutes)
- With all the groups together, go around in a circle and have students say what they are grateful for and their favorite part of the field trip.
- Thank the teacher, the Madison Meadow Board, Susan, and the meadow itself! Each group breaks off and starts heading back to school.
- East/Banana Slugs leave first, followed by North/Pileated Woodpeckers, South/Townsend's Chipmunks, and then West/Rough-Skinned Newts.
- East/Banana Slugs leave first, followed by North/Pileated Woodpeckers, South/Townsend's Chipmunks, and then West/Rough-Skinned Newts.
- Disperse back to the school in our small groups, with one facilitator at the front and one at the back of the group.
- Encourage students to use their animal forms on the walk back to the school.
- Once students get back to school, redistribute field notebooks to the teachers.
Second Pre Trip Lesson Plan
Restoring Connections
2nd Grade Pre-Trip Lesson Plan
Spring 2022
Facilitator(s): Armon Ashoubi, Emily O’Brien, Kaylie Smith, Michelle McKee, Riley Roefaro
Time: 30 minutes
Subject: Science/English Language Arts
Overview: This lesson introduces students to the concepts of habitat, symbiosis, and biodiversity. Using a species identification game, students will make observations and learn about five animal species that reside in various layers of forests. These species are: Steller’s jay (Cyanocitta stelleri), Pacific wren (Troglodytes pacificus), Townsend’s chipmunk (Neotamias townsendii), northwestern salamander (Ambystoma gracile), and the Townsend’s mole (Scapanus townsendii).
Rationale: This classroom lesson is designed for teachers who seek to introduce students to the biological diversity of forests. This interactive lesson plan introduces second grade students to some key faunal species of the pacific northwest and the complementary field lesson will focus on flora and how they all interrelate.
Learning Outcomes: By the end of this 30 minute lesson, students will be able to:
Links to Standards
Materials Needed
Background Material
An ancient forest is a large forest area where the plants are incredibly old. They have become rare on earth due to human activity and clearcutting. They are often preserved pieces of land. They contain a large biodiverse area of native species’.
The Steller’s jay is a bird of coniferous-deciduous forests, and spends most of its time in the lower forest canopy or flying from tree to tree. They nest on horizontal branches, often near the trunk and at the tops of trees. Their nests are a bulky cup of stems, leaves, moss, and sticks held together with mud and the inside is lined with pine needles, soft rootlets, or animal hair. A generalist forager, Steller’s jays eat insects, seeds, berries, nuts, small animals, eggs, and nestlings.
The Pacific wren is most common in old-growth evergreen forests and forages to build nests near fallen logs, upturned tree roots, dead tree cavities, and the thick understory cover of mosses and ferns, often near water. During the nonbreeding season, winter, wrens use more types of habitats including parks and gardens. These birds are insectivores; they eat insects such as beetles, caterpillars, ants, as well as spiders, mites, ticks, millipedes, flies, and bees.
The northwest salamander spends much of its life underground, often utilizing the tunnels of burrowing mammals such as moles and ground squirrels. Sometimes they stay in and under rotten logs. They are often found under surface objects near breeding pools or streams in the breeding season. They eat small invertebrates, tadpoles, insect larvae, snails, and worms. Salamanders are amphibians and lay eggs. The stripes on its skin are not bones, they are grooves, and they absorb water through their skin.
The Townsend’s chipmunk typically resides in coniferous forests and dense brush thickets on the forest floor where it digs burrows under decaying logs. They prefer clear cut areas, where there are decaying logs, evergreen herbs, shrubs, trees, and a variety of fungi and lichens. Crevices in loose rocks are preferred as nest sites where they create nests of shredded vegetation. They typically eat seeds, nuts, fruit, insects, roots, green vegetation, and fungi.
The Townsend’s mole resides in burrows underground. They rarely emerge from their cozy abodes down in the dirt, where they feast predominantly on soil-dwelling invertebrates. Earthworms comprise the majority of its diet, and the rest includes insect larvae, centipedes, snails, and slug
Activity Descriptions:
Step 1. Introductions (5 minutes)
Step 3. Activity - Wild Animal Scramble (15 minutes)
Adapted from: Cornell, Joseph. “Wild Animal Scramble”. Sharing Nature with Children. CA: Dawn Publications, 1998. P. 86-88. Print.
Step 4. Wrap Up (5 minutes)
2nd Grade Pre-Trip Lesson Plan
Spring 2022
Facilitator(s): Armon Ashoubi, Emily O’Brien, Kaylie Smith, Michelle McKee, Riley Roefaro
Time: 30 minutes
Subject: Science/English Language Arts
Overview: This lesson introduces students to the concepts of habitat, symbiosis, and biodiversity. Using a species identification game, students will make observations and learn about five animal species that reside in various layers of forests. These species are: Steller’s jay (Cyanocitta stelleri), Pacific wren (Troglodytes pacificus), Townsend’s chipmunk (Neotamias townsendii), northwestern salamander (Ambystoma gracile), and the Townsend’s mole (Scapanus townsendii).
Rationale: This classroom lesson is designed for teachers who seek to introduce students to the biological diversity of forests. This interactive lesson plan introduces second grade students to some key faunal species of the pacific northwest and the complementary field lesson will focus on flora and how they all interrelate.
Learning Outcomes: By the end of this 30 minute lesson, students will be able to:
- Identify the five focal species (Pacific wren, Steller’s jay, northwest salamander, Townsend's chipmunk, and Townsend’s mole) based on photos shown in the classroom.
- Describe the focal species’ habitats and what they eat.
- Compare the diversity of life in different habitats from top to bottom.
Links to Standards
- 2-LS4-1. Make observations of plants and animals to compare the diversity of life in different habitats.
Materials Needed
- Pictures of focal animal species with holes punched into the top corners. Run string through and make them so that the children can hang them around their necks. Separate these into groups of five, with each group having one of each of the different animal cards.
- Book: The Tree in the Ancient Forest by Carol Reed-Jones
- Proper clothing examples. Either wear or bring rain boots, long pants, a long sleeved shirt, a sweater, rain jacket, hat, gloves (as dictated by weather).
Background Material
An ancient forest is a large forest area where the plants are incredibly old. They have become rare on earth due to human activity and clearcutting. They are often preserved pieces of land. They contain a large biodiverse area of native species’.
The Steller’s jay is a bird of coniferous-deciduous forests, and spends most of its time in the lower forest canopy or flying from tree to tree. They nest on horizontal branches, often near the trunk and at the tops of trees. Their nests are a bulky cup of stems, leaves, moss, and sticks held together with mud and the inside is lined with pine needles, soft rootlets, or animal hair. A generalist forager, Steller’s jays eat insects, seeds, berries, nuts, small animals, eggs, and nestlings.
The Pacific wren is most common in old-growth evergreen forests and forages to build nests near fallen logs, upturned tree roots, dead tree cavities, and the thick understory cover of mosses and ferns, often near water. During the nonbreeding season, winter, wrens use more types of habitats including parks and gardens. These birds are insectivores; they eat insects such as beetles, caterpillars, ants, as well as spiders, mites, ticks, millipedes, flies, and bees.
The northwest salamander spends much of its life underground, often utilizing the tunnels of burrowing mammals such as moles and ground squirrels. Sometimes they stay in and under rotten logs. They are often found under surface objects near breeding pools or streams in the breeding season. They eat small invertebrates, tadpoles, insect larvae, snails, and worms. Salamanders are amphibians and lay eggs. The stripes on its skin are not bones, they are grooves, and they absorb water through their skin.
The Townsend’s chipmunk typically resides in coniferous forests and dense brush thickets on the forest floor where it digs burrows under decaying logs. They prefer clear cut areas, where there are decaying logs, evergreen herbs, shrubs, trees, and a variety of fungi and lichens. Crevices in loose rocks are preferred as nest sites where they create nests of shredded vegetation. They typically eat seeds, nuts, fruit, insects, roots, green vegetation, and fungi.
The Townsend’s mole resides in burrows underground. They rarely emerge from their cozy abodes down in the dirt, where they feast predominantly on soil-dwelling invertebrates. Earthworms comprise the majority of its diet, and the rest includes insect larvae, centipedes, snails, and slug
Activity Descriptions:
Step 1. Introductions (5 minutes)
- Greet students and have each facilitator introduce themselves by sharing their name and their favorite tree species that can be found in the meadow
- Ask for a quiet hand:
- Q: “What are some species that live in the habitat around us?”
- Q: “What are some species that live in the habitat around us?”
- Explain how we will be exploring a natural habitat from top to bottom.
- “When we go to Madison Meadow this Thursday, we will be exploring a natural habitat; with life all around us from the soil below our feet all the way up to the top of the trees!”
- “When we go to Madison Meadow this Thursday, we will be exploring a natural habitat; with life all around us from the soil below our feet all the way up to the top of the trees!”
- Tell the students you will be reading a book titled The Tree in the Ancient Forest. Ask if anyone knows what “ancient” means and describe it as something that belongs to the very distant past, or something very old.
- Describe an ancient forest (see background information).
- Tell the students that we can learn a lot from this book because our local natural environment, the Pacific northwest, shares characteristics with an ancient forest.
- Read the book The Tree in the Ancient Forest by Carol Reed-Jones out loud to the students.
- If necessary, use the classroom projector to show the illustrations in the book.
- Tell students to pay close attention to the illustrations of the different animals in the forest and see how they interact with each other in the same habitat.
- If necessary, use the classroom projector to show the illustrations in the book.
- After finishing the story, compliment students for being good listeners and ask for two hands:
- Q: “What animals did you notice in the story?” “Where do they live? At the tops of the trees, down at the bottom, or somewhere in the middle?”
- If time permits, ask the students if they have seen any of these animals in real life and where?
- Q: “What animals did you notice in the story?” “Where do they live? At the tops of the trees, down at the bottom, or somewhere in the middle?”
- Remind the students that even though Madison Meadow is not an ancient forest, we will see all kinds of species on our field trip.
- We will meet the Douglas fir, the giant sequoia, the Oregon white oak and maybe even some animals like the Western gray squirrel or a black raven.
- We will meet the Douglas fir, the giant sequoia, the Oregon white oak and maybe even some animals like the Western gray squirrel or a black raven.
- Inform students that we are going to play a game that teaches us more about our local animal species and how to identify them in nature.
Step 3. Activity - Wild Animal Scramble (15 minutes)
Adapted from: Cornell, Joseph. “Wild Animal Scramble”. Sharing Nature with Children. CA: Dawn Publications, 1998. P. 86-88. Print.
- Put a list of local species on the board and ask if anyone can identify them. (You can write up all of the other species that they name to make the game harder).
- Ask for their quiet attention as you share that we will be playing a game similar to 20 Questions.
- Explain that we will divide into groups of four or five students. (Explain the instructions before grouping students). Each group will be handed a set of animal cards, with one card per student. Without looking at the card, put it around your neck, with the picture on your back so you can’t see it.
- At my signal, your group will pick one person to begin. That player will begin asking yes or no questions to their group to get clues from other teammates as to what animal they are. The player asking the questions should ask one question at a time, and go around their group so everyone has a chance to respond to the questions. The team can work together to figure out the answers.
- Questions should be asked in a format to get “yes”, “no”, “maybe” and “I don’t know” answers.
- Emphasize that not knowing the answer is acceptable; just say “I don’t know.”
- Once the player feels certain that they know the name of their animal, they can ask their group: “Am I a…?” If they are right, have them flip the picture to the front of their shirt, this way the facilitator knows when a team is finished. Continue until everyone in your group has correctly guessed their animal species.
- Example questions for animals: “Do I live on the forest floor?” “Am I a carnivore?”
- Ask for questions, and maybe ask someone to repeat back the instructions if needed.
- Split the class into groups of five, so that each group has one student playing the part of each animal. Spread them out around the room, or leave them in the table group.
- Place one facilitator at each group. The teacher can also join a group if there are not enough facilitators.
- Give one picture to each player for them to wear on their back, without letting them see. Get all these pictures distributed as quickly as possible.
- Play one round. If the game goes quickly, repeat after shuffling up the species cards.
- Once time is up, collect cards from students and direct their attention to the facilitator.
- Give one picture to each player for them to wear on their back, without letting them see. Get all these pictures distributed as quickly as possible.
Step 4. Wrap Up (5 minutes)
- Ask the students how they should prepare for a great field trip. What types of clothing should they wear when going out into nature to learn and explore?
- (Note that even though it is spring, and it has been warmer, we’d like everyone to wear closed toe shoes, long pants, and long sleeve shirts, and depending on the weather, you may need more layers like rain boots, coats, gloves, and hats.)
- Remind them to eat a good breakfast before the field trip.
- (Note that even though it is spring, and it has been warmer, we’d like everyone to wear closed toe shoes, long pants, and long sleeve shirts, and depending on the weather, you may need more layers like rain boots, coats, gloves, and hats.)
- Remind the kids that on our field trip we will get the chance to be nature scientists and experience the natural world by making careful observations of the plants, trees, and animals around us. It is going to be a very special experience where we will learn so much about nature, so expect the field trip to be like outdoor class, not recess. However, come prepared to have lots of fun!
- End with thanks and excitement to see them on Thursday, and gather all materials.
Second Field Trip Lesson Plan
Restoring Connections
2nd Grade Field Trip Lesson Plan
Spring 2022
Developed By: Armon Ashoubi, Emily O’Brien, Kaylie Smith, Michelle McKee, Riley Roefaro
Time: 2 hours
Subject: Science and English Language Arts
Overview: On this field trip, second grade students will explore a local natural area and learn about the species that live there. The overarching theme is that there is life in the habitat from top to bottom.
Rationale: This lesson plan incorporates science and language arts topics while cultivating critical thinking skills and encouraging students to form a connection with the natural world around them.
Learning Outcomes:
By the end of this field trip, students will be able to:
Links to Standards:
Materials Needed:
Activity Descriptions:
Step 1. Getting Started: Welcome! And Walk to Park (15 minutes)
Step 2. Introductions & Animal Forms (10 minutes)
Step 3. 10 Second Camouflage Game (10 minutes)
Step 4. Snack and Story Time (10 minutes)
Step 5. Sit Spot (15 minutes)
Step 6. Science Time: Field Notebooks (15 minutes)
Step 7. “Story of the Day” sharing time (10 minutes)
Step 8. Game - Tree Scavenger Hunt (25 minutes)
Step 9. Wrap - Cultivating Gratitude, Giving Thanks, and Walk Back (15 minutes)
2nd Grade Field Trip Lesson Plan
Spring 2022
Developed By: Armon Ashoubi, Emily O’Brien, Kaylie Smith, Michelle McKee, Riley Roefaro
Time: 2 hours
Subject: Science and English Language Arts
Overview: On this field trip, second grade students will explore a local natural area and learn about the species that live there. The overarching theme is that there is life in the habitat from top to bottom.
Rationale: This lesson plan incorporates science and language arts topics while cultivating critical thinking skills and encouraging students to form a connection with the natural world around them.
Learning Outcomes:
By the end of this field trip, students will be able to:
- Identify features of the local, natural species.
- Communicate their observations and experiences through “Story of the Day”.
Links to Standards:
- 2-LS4-1. Make observations of plants and animals to compare the diversity of life in different habitats.
Materials Needed:
- Name Tags
- Paint Swatches (1 per student)
- Field Journals
- Pencils
- Sit Spot Tarps
- Plant ID Tags
- Scavenger Hunt Sheet
- Snacks, Water & Water Cups
Activity Descriptions:
Step 1. Getting Started: Welcome! And Walk to Park (15 minutes)
- Before leaving the school, establish expectations and group agreements by asking students to share their classroom rules and ideas on how we can stay safe on our field trip. (Staying out of the street and not wandering away from the group). Establish a bathroom break plan.
- While walking, hand out 1 paint swatch to each student and have them match the color to plants or flowers they see along the way.
- After students arrive at the park, have them gather in their designated groups (Steller’s Jays, Townsend’s Moles, Townsend’s Chipmunks, Rough-Skinned Newts).
- Have students introduce themselves with their name and their favorite animal.
Step 2. Introductions & Animal Forms (10 minutes)
- Have students introduce themselves and ask them what their favorite outdoor activity is (and/or favorite animal/if they’ve been to the meadow before).
- Introduce animal forms to students.
- Owl Eyes: Ask students what is special about owls. Explain that owls have peripheral vision that allows them to see all around them. Have students hold their arms out in front of them, and slowly move them to the side, until they can barely see their hands in their peripheral vision. Have students repeat the words “peripheral vision” and explain that they can use their owl eyes throughout the day to spot different plants and animals.
- Deer Ears: Ask students what deer have to help them hide from predators. Explain that deer are prey, and they use their big ears to listen for approaching predators. Have students cup their hands behind their ears and listen to what they can hear around them.
- Coyote Feet: Ask students if they have seen a coyote in nature before. Explain that they are hard to sight because they are quiet and sneaky. We can be quiet like coyotes by using our coyote feet. Have students practice their coyote feet by having them walk past you without making a noise.
- Owl Eyes: Ask students what is special about owls. Explain that owls have peripheral vision that allows them to see all around them. Have students hold their arms out in front of them, and slowly move them to the side, until they can barely see their hands in their peripheral vision. Have students repeat the words “peripheral vision” and explain that they can use their owl eyes throughout the day to spot different plants and animals.
Step 3. 10 Second Camouflage Game (10 minutes)
- Game: Hide & Seek, but students must be able to see your eyes from their hiding spot
- Explain the rules of the game to the students
- 10 second camo is like hide & seek, but you must be able to see the facilitator's eyes from your hiding spot.
- Have other facilitators/aides act as boundaries for the game area.
- Explain that the facilitator will count to 10 while you try to find a camouflaged hiding spot.
- Explain that there is no winner. Instead, the objective of the game is to camouflage with their environment as best as they can.
- 10 second camo is like hide & seek, but you must be able to see the facilitator's eyes from your hiding spot.
- Count to 10 out loud, then call out students based on their movement or color (what you see).
- At the end of the game, have students share what made some of them hide well and what made others get found quickly.
Step 4. Snack and Story Time (10 minutes)
- Have a chaperone or facilitator pass out the snack and water to students.
- Tell a story focusing on the magic of springtime, and make it rich with natural history facts about focal species in the habitat.
- The story should introduce the concept of sit spots (explained below) to the students and get them excited to have a moment alone in nature (activity is directly after snack and story time). Be sure to embed how ‘to be’ in the woods- showing how full of awe, amazement, respect and excitement you are!
- If there is downtime, listen for birds and have the students map the bird sounds with their fingers, or teach students how to “crow call”.
Step 5. Sit Spot (15 minutes)
- Sit each student at a different tree or shrub in the surrounding environment.
- It is critical to space the students out and turn their backs to one another so that they don’t get distracted.
- Encourage students to use their animal forms (owl eyes and deer ears) to silently look for signs of spring. Model this yourself while they are doing their sit spots, as more times than not students are looking to see what you’re doing.
Step 6. Science Time: Field Notebooks (15 minutes)
- Pass out field notebooks and pencils to students in their sit spots.
- Encourage them to capture what they see, hear, smell and feel as accurately as possible.
- You may give students a branch or a leaf and encourage them to sketch it in their journal.
- If it is raining, skip this part and use this time to jump in the puddles!. Have them work on their notebooks back at school.
Step 7. “Story of the Day” sharing time (10 minutes)
- Ask each child to share one thing they noticed in their sitspot.
- Try and have the students guess other students' trees based on their observations only.
- Use the art of questioning to dive deeper into their observations. Be sure questions push them to use all of their senses.
Step 8. Game - Tree Scavenger Hunt (25 minutes)
- Set this activity up prior to the field trip. If there are multiple facilitators, one may set this up at the beginning of the trip during introductions and animal forms,
- Print the attached plant ID tags and cut so that each plant ID is its own slip.
- Place each slip in a sheet protector, and place them in front of their corresponding plant.
- If it is a windy day, rocks may be used as paperweights.
- Print the attached plant ID tags and cut so that each plant ID is its own slip.
- Explain the rules of this scavenger hunt and pass out sheets to each pair of students.
- We will travel around this habitat while using our owl eyes to spot key species. We will use the pictures on our scavenger hunt sheets as hints of what we should be looking for to find the species.
- Once each pair finds a plant species, have them label the image on their sheet, copying the name from the plant’s name tag (optional if it is raining). Have one student volunteer to read the plant description out loud.
- Before leaving to the next plant, take time to make “I notice” statements about the species.
- We will travel around this habitat while using our owl eyes to spot key species. We will use the pictures on our scavenger hunt sheets as hints of what we should be looking for to find the species.
- Rotate around the habitat, searching for these key plant species.
Step 9. Wrap - Cultivating Gratitude, Giving Thanks, and Walk Back (15 minutes)
- Have all students gather into a large circle.
- Go around the circle and have a student representative from each group share one thing they learned during their field trip.
- Thank the chaperones, teacher, and the land that we are on!
- Leave meadow by (11:15)